About the Recipe
Beef Wellington is a very popular and elegant dish that is loved by many. Topped with Béarnaise sauce, it is a culinary icon that will impress and delight your guests. It is a bit of a long process to complete but it is well worth the effort.
Ingredients
16 oz. (~450 grams) chunk of beef tenderloin (for 2 servings
½-¾ cup of Mushroom Duxelles

1 pound center cut chunk of beef tenderloin (for 2 servings)
1 pound (454 grams) of salted butter
5 slices of prosciutto ham
1 egg
¾ teaspoon of dried oregano
Salt
Pepper
~1 tablespoon of Maille old style mustard (or Dijon)
1 x 10”x10” puff pastry sheet
Béarnaise Sauce
.jpg)
➡️ Prepare all of your ingredients in advance (Mise en Place).
Preparation
➡️ Please read the entire recipe before proceeding.
Duxelles
You will need between ½ and ¾ cup of Duxelles per Wellington.
Make enough mushroom Duxelles for the number of Wellingtons you are preparing.
Given that Duxelles takes a long time to prepare, I usually make it a day in advance.

Béarnaise Sauce
You don’t have to make the Béarnaise in advance, you can make it just before you are ready to put the Wellingtons in the oven, or even while they are in the oven.
A full batch of sauce is enough for about 4 Wellingtons.
This recipe is only for one Wellington, or two 8 Oz servings. You may want to reduce the amount of sauce you are making unless you plan on making more than one Wellington.

Beef Prep
Most cuts of beef tenderloin will likely be perfectly uniform. If that is the case, you can skip this step.
However, if your cut is imperfectly shaped, as is the case in the image below, you can tie it with meat rope to keep it together for the searing step. Once you have seared and cooled the meat, you will be cutting off the meat rope before moving on to the next steps.


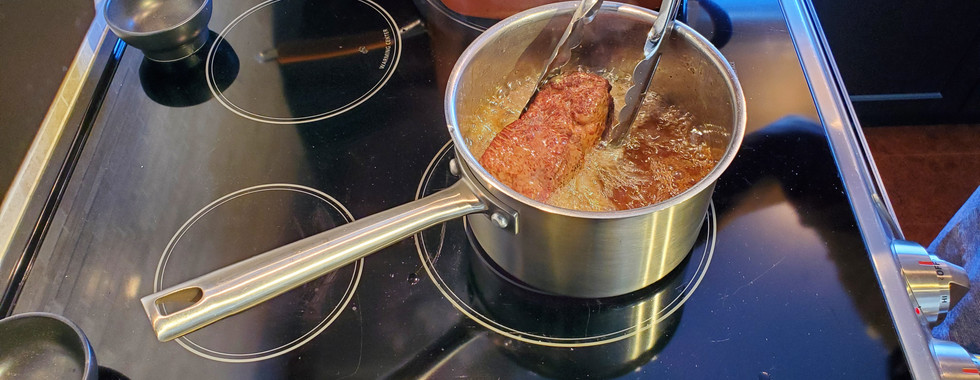
Seasoning & Searing
Put one pound (454 grams) of butter in a pot and set the temperature to medium-high.

Season the meat with salt, pepper and oregano. Do not salt it too much as the prosciutto ham layer will add a lot of salt on its own. Alternatively, you can season the meat with whatever you want.

Once the butter is hot, introduce the chunk of beef tenderloin.
The butter should boil vigorously once the meat is introduced. If it doesn’t, remove the meat and let the butter heat more.
This step is only for searing the meat and not for cooking it. The total searing time should only be about one minute.


Once the meat is seared, remove it from the butter, set it aside and let it cool.
Once cooled to room temperature, refrigerate the meat for at least one hour before moving on to the next steps.

Candy Wrapping with Prosciutto & Duxelles
Lay out 2 overlapping sheets of cling wrap on your countertop.

Lay 3 slices of prosciutto ham over the center of the cling wrap, overlapping them, as depicted in the image below. If you prosciutto ham is narrow, use 4 slices instead of three.
Cut one slice of prosciutto in half and overlap it on the left and right.

Spread the Duxelles evenly over the surface of the ham, as depicted in the images below.
Do not put any Duxelles on the left and right protruding end pieces that you cut in half.
Pat the Duxelles down to flatten it on the surface of the ham.


Cut off the meat rope, if you had to use it, and rub the meat with Maille mustard. If you prefer, you can use Dijon mustard. Personally, I like the Maille as it is not as strong tasting but you are the master of your own Wellington.


Lay the meat onto the center of the Duxelles, as depicted in the image below.

Starting either on the left or the right side, lift the cling wrap and fold the flap of ham over the end of the meat, as depicted below. Then, pull the cling wrap back to its original position.


Repeat the process for the other end of the Wellington. If need be, position the flap of ham evenly over the Wellington.


Repeat the process for the long sides of the Wellingtons. If the ham and Duxelles does not completely cover the Wellington, add a slice of ham along the center.

Once you have your initial wrap, fold the cling wrap over one side of the Wellington on the long side, as depicted below.
The object here is to roll the Wellington tightly in the cling wrap, like you were wrapping a candy.

Once you have overlapped the roll from one side, roll it forward to completely surround it in cling wrap.


Now, grab the ends and roll the Wellington forward on the counter top to twist the ends and squeeze the roll into shape. Do not over-tighten the roll or it will be more like a ball than a cylinder.


Refrigerate the roll for 1-2 hours before moving on to the next step.

Pastry Wrapping
If your puff pastry is frozen, remove it from the freezer only when you are ready for this step. Let the pastry sheet thaw on a lightly floured countertop.
Typically, frozen puff pastry is folded in three. As it thaws, unfold it carefully to prevent it from sticking together. Do not force it open to quickly or the dough will split at the seams. Once you can open it up, let it thaw a bit more before pressing on the seams.
If the dough is wet and sticky, dust it generously with flour.


Once thawed, you can use a rolling pin or pastry roller to even out the dough, if required.

Sweep off any excess flour from the pastry using a pastry brush.

Unwrap the candy-wrapped Wellington by pulling on both ends of the twisted cling wrap, like you would to quickly unwrap a candy.
After having cooled, you will notice that the Wellington holds its shape, making it easy to complete the next step.


Lay the Wellington down onto the center of the puff pastry sheet.

Fold the dough over both ends of the Wellington.


You can use a pastry roller to flatten the overlapping dough a bit.

Beat one egg in a bowl for use the next steps.

Egg wash the exposed surface of the dough to ensure it bonds together in the next steps.


Bring the two long edges together and join them in the center. Start by folding one end over then folder the other end towards it and pinch them together in the center.
The seam you have created in the center will only add to look of the Wellington.
Never hide the seam on the underside of the Wellington or the dough might be too thick to cook properly. Excess dough on the top of the Wellington will gook very nicely.


At this point, you can refrigerate the Wellington until you are ready to put it in the oven.
Most of the time, Wellington are prepared in advance, before the guests arrive.
Roasting
I use a piping bad tip to make a perfect hole in the center of the Wellington, which serves as a steam vent.


Egg wash the Wellington.
Insert a temperature or a meat thermometer.
As you can see in the image below, I have inserted a temperature probe all the way to the center of the Wellington. You can also use a meat thermometer, if you don’t have a temperature probe.


If you are making more than one Wellington, you only have to put the probe in one of them. As long as you make them all the same size, they should all be cooked to the same degree in the same amount of time.
If you are cooking more than one and you want some cooked more than others, put the probe in the one that you want to cook the most.
For example, if you want one medium rare and one medium, put the probe in the one you've decided will be medium. Then, remove the medium rare from the oven once the probe reaches 130-134˚ F and then continue to cook the other until it reaches 140-150˚ F.
Of course, some of your guests will get their Wellington before others, but at least they will have it done the way they like. The difference in time will not be great between medium rare and medium.
However, if one guest wants a rare Wellington and another wants it well done, it can complicate the cooking process.
For a Rare Wellington:
Preheat the oven to 425˚ F (218˚ C) – Convection Bake.
Put the Wellington in the oven, un-covered, and connect the temperature probe.
Bake for 10 minutes then reduce the temperature to 350˚ F (176˚ C) and continue baking until the internal temperature reaches 120-130˚ F (48-54˚ C).
For a Medium Rare Wellington:
Preheat the oven to 425˚ F (218˚ C) – Convection Bake.
Put the Wellington in the oven, un-covered, and connect the temperature probe.
Bake for 10 minutes then reduce the temperature to 350˚ F (176˚ C) and continue baking until the internal temperature reaches 130-134˚ F (54-56˚ C).
For a Medium Wellington:
Preheat the oven to 425˚ F (218˚ C) – Convection Bake.
Put the Wellington in the oven, un-covered, and connect the temperature probe.
Bake for 10 minutes then reduce the temperature to 350˚ F (176˚ C) and continue baking until the internal temperature reaches 140-150˚ F (60-65˚ C).
For a Medium Well
Preheat the oven to 350˚ F (176˚ C) – Convection Bake.
Put the Wellington in the oven, un-covered, and connect the temperature probe.
Bake for until the internal temperature reaches 155-165˚ F (68-73˚ C).
For a Well-Done
Preheat the oven to 350˚ F (176˚ C) – Convection Bake.
Put the Wellington in the oven, un-covered, and connect the temperature probe.
Bake for until the internal temperature reaches 170˚ F (76˚ C).
Serving
Cut the Wellingtons in half and serve half per person.
Top with Béarnaise sauce and serve with the accompaniments of your choice.
