About the Recipe
Tired of spending big bucks on pizza only to be disappointed? Once you try this recipe, you will be making your own "superior" pizza at a fraction of the price and you can make it just the way you love it. It's all about the crust and the process. Dive into this recipe and begin your journey into becoming a pizza master.
Ingredients
6 cups of all-purpose flour (+ 1 to 1 ½ cups for 2nd knead
3 cups of water
¾ teaspoon of salt
3 ¼ teaspoons of granulated white sugar
2 teaspoons of extra light olive oil
16-20 grams of active dry yeast or instant yeast
2-3 tablespoons butter
Toppings of your choice
➡️ Prepare all of your ingredients in advance (Mise en Place).
Preparation
➡️ Please read the entire recipe before proceeding.
This recipe is for 2 large, thick crust pizzas.
For a regular crust, a single pizza or a different size, refer to the chart at the end of this recipe or click on the link below to jump directly to the chart.
🖱️Jump to Pizza Quantity & Size Chart
Making pizza dough is essentially the same as making bread. However, a bit of oil is added to the mix to prevent the pizza crust from being too hard.
Useful Pizza Making Tools


Proofing Active Dry Yeast
Omit this step if you are using instant yeast. Using instant yeast saves time as you do have to wait for it to proof. It can be added directly to the flour, along with the sugar. If you are using instant yeast, click on the following link to go directly to:🖱️ Making the Dough.
In a saucepot, combine:
3 ¼ teaspoons of granulated white sugar
3 cups of water
Mix until the sugar is partially dissolved.
Heat the water to 100-110˚F – 37-43˚C.


Remove from heat, add 16-20 grams of active dry yeast and mix until it is dissolved.

Cover the pot and place it in a warn area to let it rise. (10 to 15 minutes...depending on the temperature of the environment). The mixture should be very foamy when the yeast has proofed to the proper extent.
If the yeast does not foam, it is dead and should not be used as the dough will not rise.

Making the Dough
For Instant Yeast Only
If you are using instant yeast, heat 3 cups of water to 100-110˚F – 37-43˚C. Otherwise, skip this as you already have the water you need from the previous step.

The visual depictions to follow are not for the base quantitates in this recipe. They are for a single, regular crust pizza. However, the process is the same regardless of the number or size of the pizzas.
Put 6 cups of all-purpose flour in a large bowl.
Flour can have little clumps that sometimes affect the consistency of the dough. Although it is not absolutely necessary, it is a good practice to either sift the flour or work it through your fingers to loosen-up any clumps there might be.


If you are using instant yeast:
Add 16-20 grams of instant yeast directly to the flour
Add 3 ¼ teaspoons of granulated white sugar directly to the flour
Add the ¾ teaspoon of salt.
Mix well to evenly distribute the salt, sugar, and yeast into the flour.


Make a basin by pushing flour away from the center and towards the sides of the bowl. This is done to hold the water in the next step.

Add the water and proofed yeast mixture, or just the heated water if you are using instant yeast.


Add 2 teaspoons of extra light olive oil.


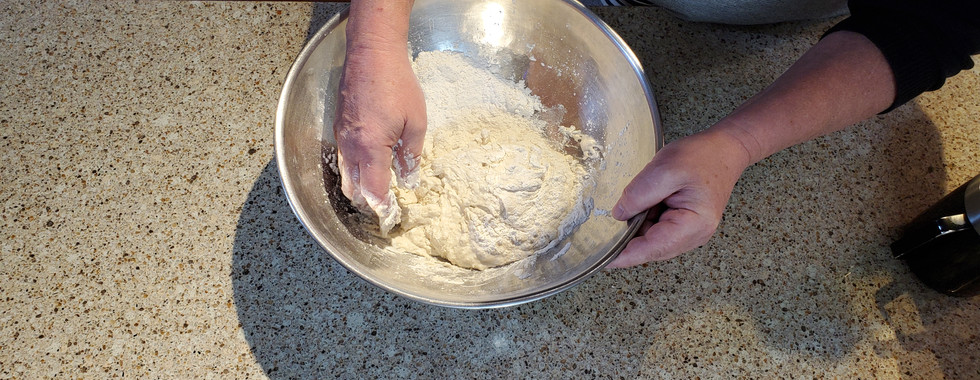
Using your fingers, begin by gradually incorporating the flour with the water. Do not try to incorporate too much flour at once.
It will be messy at first but will eventually become more like a bread dough. Knead until the dough is no longer sticky.
The dough may still be sticky if your fingers pierce through it but you should be able to knead it in the bowl without it sticking to your fingers.


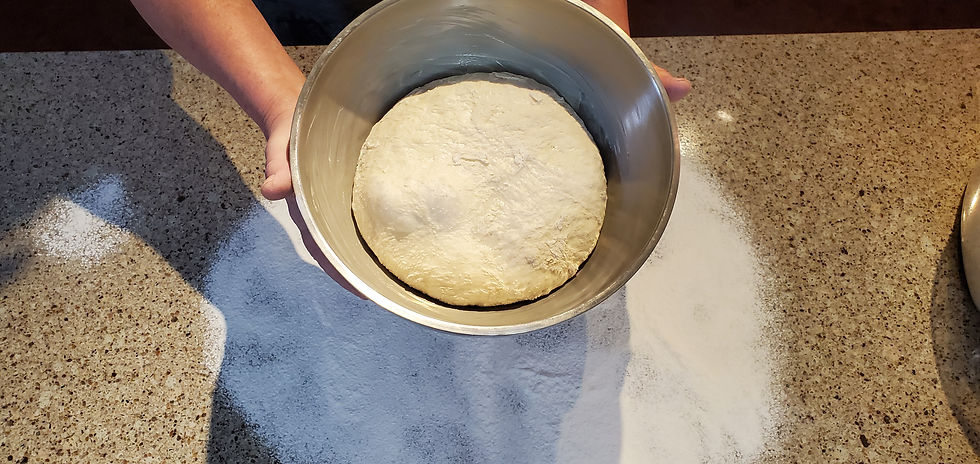
Place the dough in a well buttered bowl that is large enough to allow the dough to double in size and cover it with a tea towel.
Make sure the entire inside surface of the bowl is well coated in butter.


Set it in a warm place to let it rise.
Rising time will vary with the room temperature. Rather than rely on a set time, let the dough stand until it has "at least" doubled in size. I let mine go a little longer to make sure it is well risen.
Second Kneading
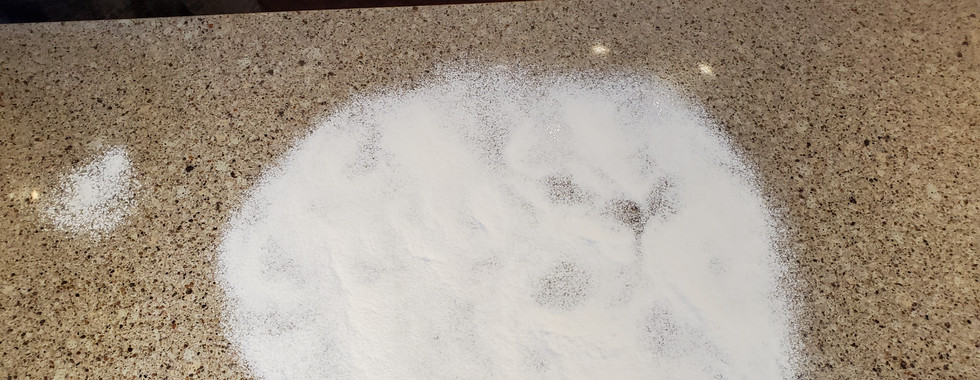
Flour the surface of your countertop.


Tilt the bowl of risen dough and let it fall onto your flowered surface.
You may have to coax some of it out of the bowl.


Knead the dough on the flowered surface until you have taken out all the air bubbles.


Put the dough back in the bowl for a second rise.


Final Kneading & Rolling
Remove the flour you sprinkled on the countertop during the previous step as it will likely have hard lumps in it.


Once again, flour the surface of your countertop.
Tilt the bowl of risen dough and let it fall onto your flowered surface.
Knead the dough on the flowered surface until you have taken out all the air bubbles.


Lightly coat the entire surface and edges of your pizza pan(s) with butter. This will prevent sticking and it will help your pizza crust brown nicely.
Do not do this for perforated pizza pans as the butter will drip into your oven. You can lightly rub perforated pans with a bit of cooking oil.


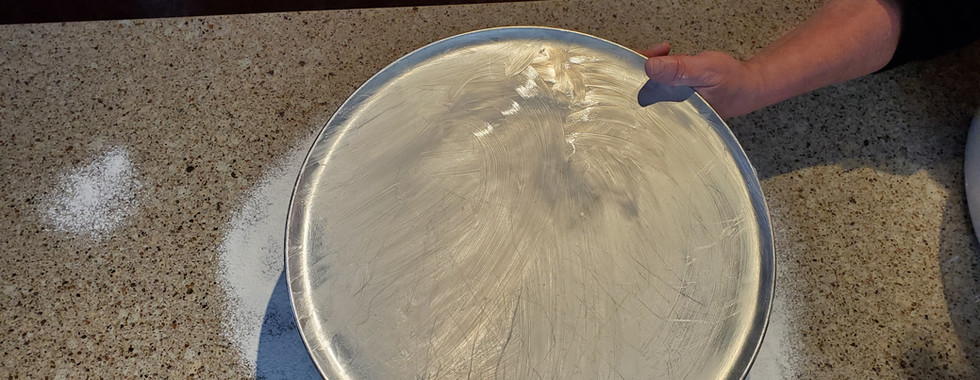
Observation: During testing in the Food Lab, I found perforated pans to be disadvantageous and, therefore, do not recommend them. In my opinion, you are better off with a regular, unperforated pan.
Cut the dough ball into 2 even pieces using a sharp, buttered knife, unless you are making only 1 pizza.
Having a food scale is great for this task as you can make each pizza crust exactly the same size. If you don't have a food scale, just go by eye.

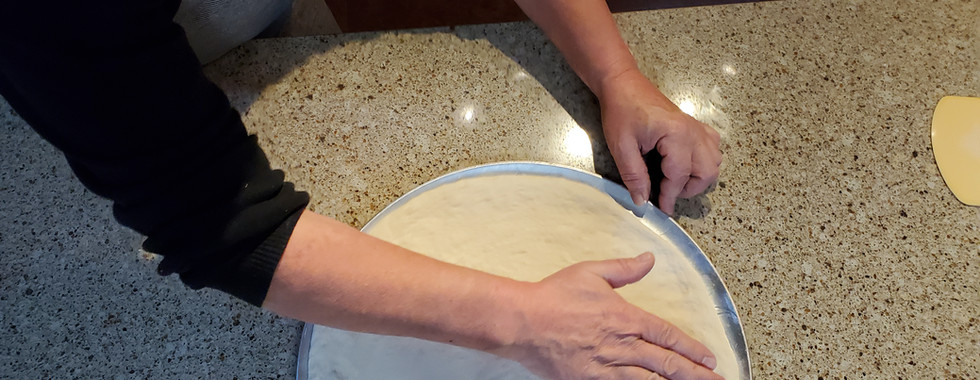
Use a rolling pin to roll out the dough roughly into the shape of your pizza pan, be it square or round.


Lay the dough onto your pizza pan and spread it evenly, leaving the outer edges a little thicker.
If the dough is too springy to push to the edges, cover it with a tea towel and let it rest for 4-5 minutes and then continue. Resting the dough relaxes the gluten and makes it easier to stretch.
You can dust your hand with a bit of flour while you are doing this if the dough is sticking to your fingers.


Using pizza dough docker, make holes over the surface of the entire crust except for about ~1” (~2 cm) from the outer edge. This will prevent the formation of air bubbles in the crust. Since we want the outer edges of the crust to puff up, we do not make holes there.
If you don’t have a dough docker, you can use a fork to make the holes.


Adding Your Sauce & Toppings
For a tangy and delicious pizza sauce with a classic flavor, try my recipe by clicking on the link below:
.jpg)
About the Toppings – What to do to prevent “Soggy Crustosis”.
One of the key things to keep in mind when putting the sauce on your pizza is to not overdo it. Too much sauce will lead to a soggy crust.
Putting on too much sauce is not the only thing that can lead to the dreaded "soggy crustosis". The following toppings require extra preparation steps to prevent this from happening.
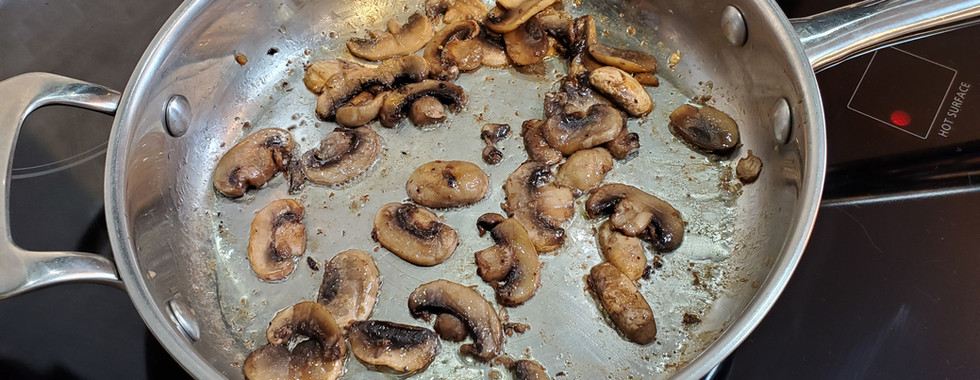
Mushrooms
Mushrooms contain a lot of water so, if you plan on adding some to your pizza, they should be fried in butter long enough to extract the moisture they contain and dry them up before adding them. Otherwise, they will create a pool of brine on your pizza and, subsequently, make your crust soggy.


Topping Moisture
All toppings that contain a lot of moisture should be patted dry with a paper towel after they have been cut into pieces and before putting them on the pizza. This includes bell peppers, olives, pineapple, spinach or any other vegetable you plan on adding. Failure to do so may result in a liquid buildup on your pizza.


Although olives are a great addition to your pizza, they are very salty so it is best to use them sparingly. The olives should also be patted down with a paper towel to sop up the brine.


Over-loading
Beware of over-loading; it’s easy to do. In my experience, pizzerias tend to be skimpy with the toppings, even when you order double. So, when you are the master of your own process, it’s easy to get carried away with the toppings, given that you can load on as much as you want. However, it is yet another caveat to add to the list of things that can lead to a soggy crust.
Predominantly, the pizzas we have all come to love are made with a tomato based sauce and Italian herbs. However, a béchamel based sauce, or a white creamy sauce is also a great and well known option. It could be a mushroom sauce, a seafood sauce or some other variation that is not based on tomatoes.
Pizza with Tomato Sauce
Start by spreading a moderate coating sauce all around the outer circumference of the crust, leaving about 1” (~2 cm) from the outer edge without sauce, as depicted in the images below.
You don’t have to spread the sauce in this manner. I just find it easier to avoid smearing the edges if I start by encircling the dough with sauce and then filling in the center.

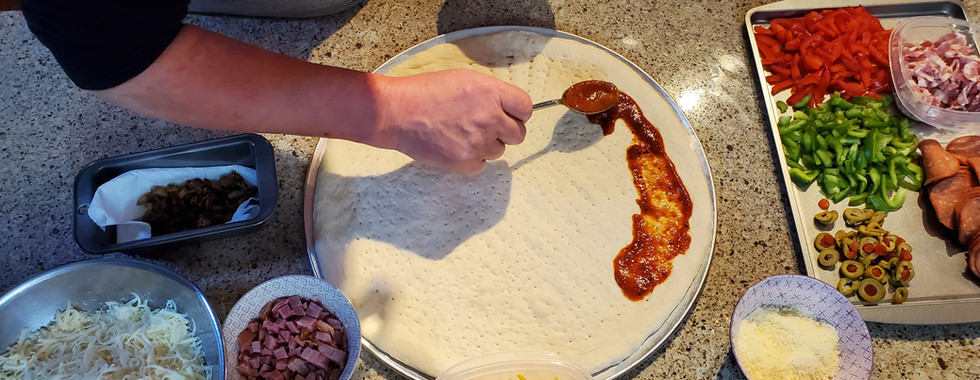


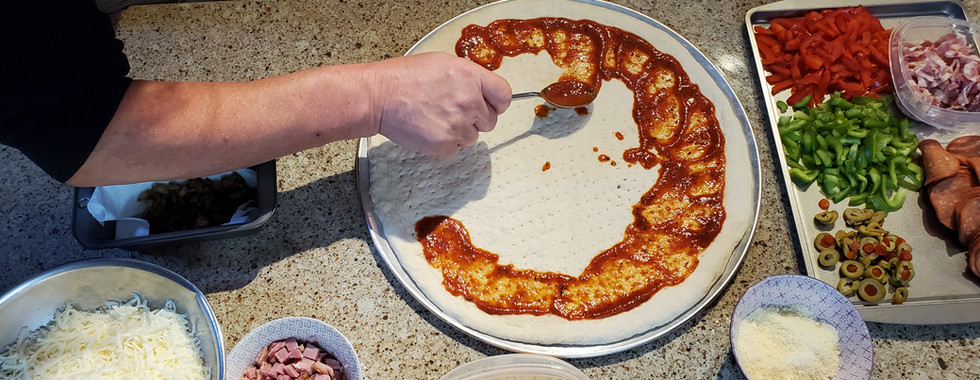


After saucing the edges, use your spoon to push some of the sauce away from the outer rim and toward the center.
If there is too much sauce near the edges, it might leak over the crust during the cooking process and make a mess.


From here, the order that you follow for your toppings is up to you. However, there is a general methodology that makes sense when it comes to a tomato sauce based pizza.
Guidelines
Suggested Order of Processes
I start with a bit or parmesan cheese sprinkled over the sauce.


Then, I add toppings with a light sprinkle of cheese in a few layers.


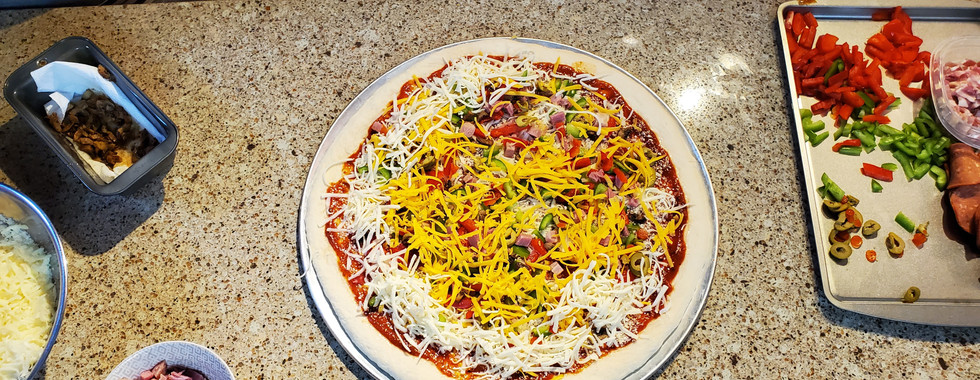


Pepperoni Placement
Pepperoni can be added as a final topping or as one of the last items to go on the pizza. If you prefer, you can finish with a final dusting of toppings and cheese. It’s up to you. It is appealing to see some or all of the pepperoni when the pizza is cooked, as opposed to having it completely buried under toppings. This adds to the esthetic aspect of the pizza and allows the pepperoni to brown a bit. Nevertheless, it is not a law and you can add the pepperoni wherever you choose.

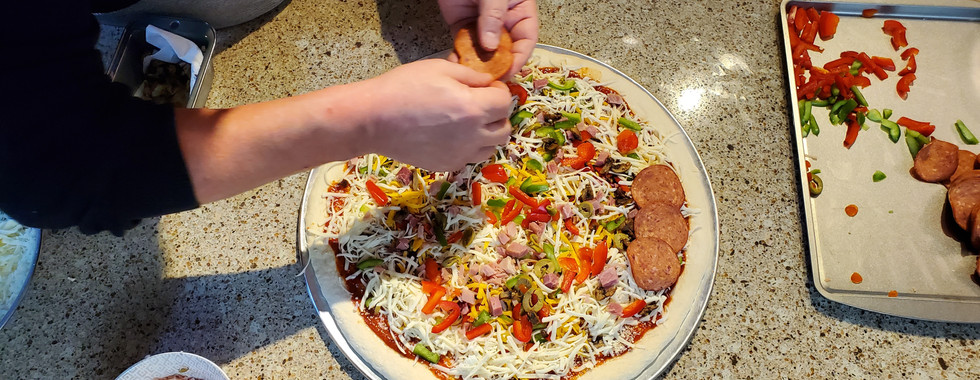


Bacon
If you are adding bacon, it should be the absolute last item to go on. In addition, it should not go on fully cooked as it will become very hard and it should not go on raw as it will release too much fat. The perfect balance is found by partially cooking, or blanching the bacon in advance. It should be limp and rendered, but not browned at all. If you are adding only a small amount of bacon, you don’t really have to blanch it. Also, if you bury the bacon in the middle of the pizza, it can be cooked completely before adding it without it turning to rock. There are always options when you’re the pizza boss.


Great Accessory
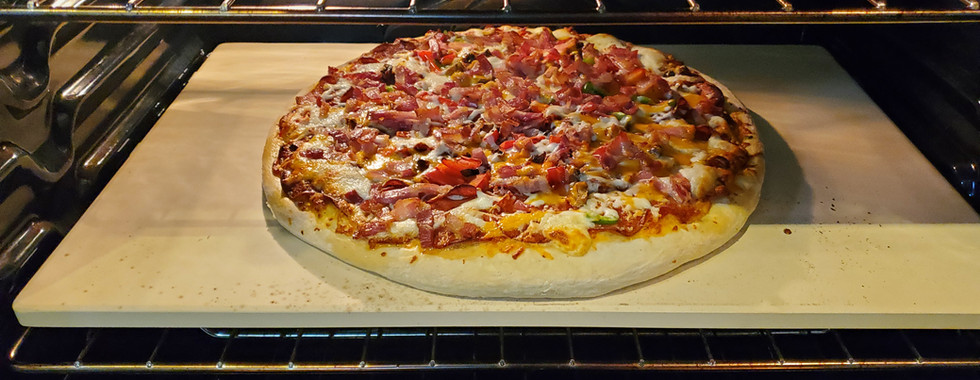
Pizza Stone
A wonderful addition to your pizza making equipment arsenal is, without a doubt, a pizza stone. I use a 22”x14” stone and put it on the lowest rack in the oven. After about 13 minutes of baking, I remove the pizza from the pan and slide it directly onto the pizza stone until it is done. The result is a wonderfully browned and crispy crust. Towards the end of the cooking process, lift the crust using a spatula or pizza peel to see how well the crust is browning. Cooking time varies with the size of the pizza but 20-35 minutes is usually sufficient. Once the crust is nicely browned, the pizza is done.
If you have a pizza stone, it's a good idea to put it in the oven about ½ hour ahead of time and set it to 475-500˚F (246-260˚C) “Convection Bake”, if your oven has the feature. If your oven does not have the convection feature, simply set it to “Bake”. Dot not use the “Roast” feature as it will heat from the top and over-brown your pizza before the crust is properly cooked. Before putting the pizza in the oven, reduce the temperature to 425˚F (218˚C). The idea behind this is simply to get the stone good and hot in advance.


Another big advantage to using a pizza stone is it can double as a hotplate to keep your pizza warm after it is cooked.
Lay your pizza onto a cutting board and slice it. I have a large wooden cutting board that is perfect for a large pizza.
If you prefer, you can cut the pizza directly in the pan but you should never cut it when it is on the stone as the stone can easily be damaged.


Return the pizza to the pan and lay the pizza pan on the stone. It will stay hot for a long time and will keep your crust crisp.

🖱️Click Here to Jump Back to the Beginning
Pizza Quantity & Size Chart - Based on Proportions from Main Recipe
# of Pizzas | Size | Crust | Flour (Cups) | Water (Cups) | Sugar (Tsp.) | Yeast (grams) | Oil (Tsp.) | Salt (Tsp.) |
|---|---|---|---|---|---|---|---|---|
2 | L | Thick | 6 | 3 | 3 ¼ | 16-20 | 2 | 1 |
2 | L | Regular | 5 | 2 ½ | 3 | 16-20 | 2 | ¾ |
1 | L | Thick | 3 | 1 ½ | 1 ½ | 8-10 | 1 | ½ |
1 | L | Regular | 2 ½ | 1 ¼ | 1 ½ | 8-10 | 1 | ½ |
2 | M | Thick | 4 | 2 | 2 ½ | 12-16 | 1 ½ | ½ |
2 | M | Regular | 3 ¾ | 1 ¾ | 2 ¼ | 12-16 | 1 ¼ | ½ |
1 | M | Thick | 2 | 1 | 1 ¼ | 8-10 | ¾ | ¼ |
1 | M | Regular | 1 ¾ | ¾ | 1 | 8-10 | ½ | ¼ |