About the Recipe
When it comes to stuffed pork loin or tenderloin, there are many themes and variations you can create. No matter what you want to stuff your pork roll with, follow these steps to prepare the meat. Then, stuff it and roll it up with the ingredients that inspire you.
Ingredients
Pork Tenderloin or Pork Loin in the quantity you desire.
Stuffing of your choice
Seasonings of your choice
Preparation
Preparing a Pork Loin
Whether you are using a pork loin or pork tenderloin, the preparation is similar. With a pork loin you are working with one chunk of meat. The idea is to cut the loin like you were unrolling a curled up cloth. Start by cutting about 1/4 to 1/3 of an inch under the top fat layer along the entire length of the loin. Continue cutting into the loin, trying as much as possible to maintain a consistent thickness, until you have created a flat sheet of meat.


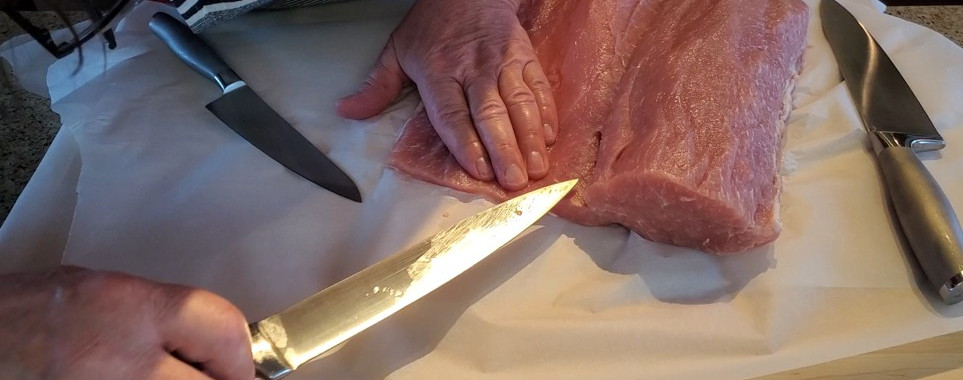


Once you have cut the loin into a sheet, lay it on a parchment paper or cling wrap and pound it on both sides using a meat tenderizer hammer.
During this step, try to shape the meat into as perfect a rectangle as you can.
The pork loin is now ready for the next steps: Seasoning the meat, covering it with your desired stuffing, rolling it, tying it and, finally, roasting it.


Once you are done pounding your meat 😉, you can roll it up and refrigerate it until you are ready to make your roll.


The pork tenderloin sheet is now ready for the next steps.
Seasoning the meat
Covering it with your desired stuffing
Rolling and tying
Roasting
Jump to "Seasoning the Meat".
Preparing a Pork Tenderloin
Unlike with a pork loin, where a single piece of meat is involved, when you are stuffing pork tenderloin, two or more tenderloins are typically pounded together to create enough surface area for a pork roll. Working with pork tenderloins, as opposed to a pork loin, is a bit more difficult. However, if you don't mind the carving challenge, it is entirely doable.
Like with a pork loin, start by cutting about ¼ of an inch into the meat along entire length of the tenderloin.
Continue cutting into the tenderloin, trying as much as possible to maintain a consistent thickness, until you have created a flat sheet of meat.
Overlap your sheets lengthwise on parchment paper or cling-wrap and pound them together using a meat tenderizing hammer.

If you don’t have a meat tenderizing hammer, you can cover the meat with cling wrap and pound it with a cast iron fry pan, or any other heavy pan.

The pork tenderloin sheet is now ready for the next steps.
Seasoning the meat
Covering it with your desired stuffing
Rolling and tying
Roasting
Seasoning the Meat
Each recipe will have its own seasonings and rubs. For example, you may want to rub teriyaki sauce over the inside layer of meat. You can add "Mike's Season All" or any spice blend you choose.


The recipe will also likely call for additional seasoning once the pork is stuffed, rolled and tied.

Stuffing Layer
Before adding your favorite stuffing mix, you can choose to cover the surface of the pork with a deli meat, like, salami, summer sausage, prosciutto ham, or mortadella. This not an absolutely necessary step but it does add a lot of flavor. It all depends on the recipe. You are the master of your own kitchen so you can do whatever you want.


Prepare your stuffing according to the recipe, or your imagination, and cover the surface of the meat evenly.
The thinner the stuffing layer, the more swirls you will have. A thicker stuffing layer will create more of a tube of meat with stuffing in the center. It all depends on the recipe and your preferences.


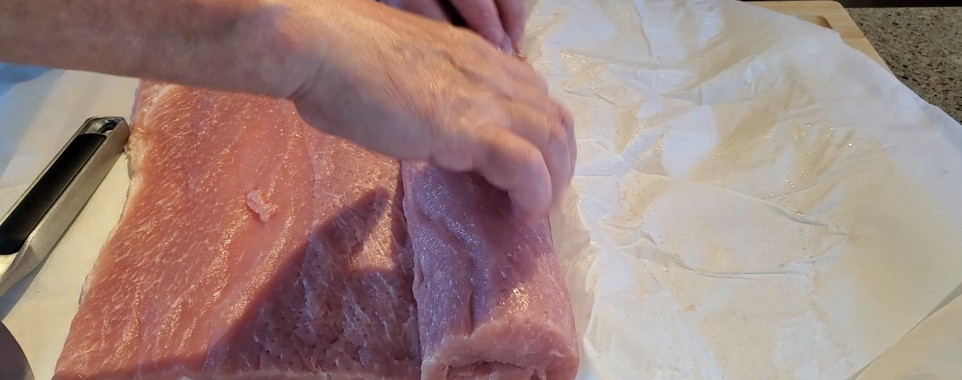
Rolling the Sheet
This final part can be a bit difficult, but having started with your pork on a piece of parchment paper or cling-wrap will help you create a nice roll. This process is the same whether you are using loin or tenderloin. However, tenderloin is a bit more difficult to work with. You will, of course, need good quality butcher’s rope. If you are not familiar with the butcher’s knot, check online for examples.
Begin the roll by lifting one side of the parchment paper and folding the meat over on itself, as depicted below. Then, return the parchment paper to its original position and press down on the meat to help it hold its shape.
In the example below, there is a very thick layer of stuffing. With a thinner layer, it will be easier to roll and you may not have to use this fold-over method. You may be able to simply roll it up by starting at one end and rolling it all the way to the opposite end.
Always start rolling with the fat side down and at the end without the fat. In the end, it is best to have the fat layer on top of the finished roll and not buried in the center.


Repeat the process with the other side, making as tight a roll as you can.


Tying the Roll
Tie the roll beginning at the center.
If you know how to make a butcher’s knot, you’re all set. Otherwise, you can simply tie the roast as you would with a standard knot, like you would make for tying a shoe. The difference is, you cross the string around itself twice, or even three times, instead of just once before making the bow. This will prevent the string from slipping when you tighten it. Of course, you will not make a bow as you would with a shoe. Instead, you will just make a second "single" knot to secure your first knot.


Work your way to the ends and tie the ends tightly. Tenderloin rolls will require more ties.
Trim the strings close to the knot.


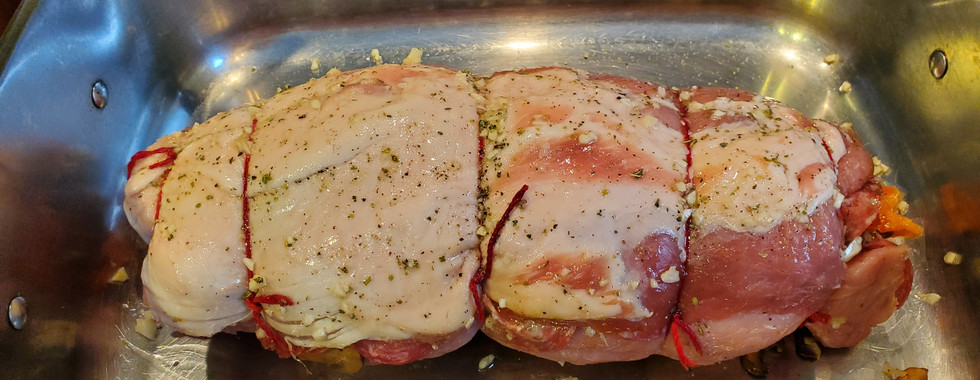
Example of a roll made with tenderloin (note that additional tying was required):

Roasting
Season and cook according to directions in the recipes, or as you would an ordinary roast.
If you are making your own imagination inspired variation, I recommend cooking it for 2-3 hours at 350˚ F (176˚ C) Convection Roast.
The internal temperature must reach 165˚ F (74˚ C).